How to Hard Reset Samsung Galaxy A12 (Factory Reset Guide)
How to Hard Reset Your Samsung Galaxy A12 (Master Reset)
Performing a hard reset (also known as a master reset or factory reset) on your Samsung Galaxy A12 will erase all personal data, apps, and settings, returning the device to its original factory condition. This process is often used to:
- Fix persistent software issues, crashes, or performance problems.
- Remove viruses or malware.
- Prepare the phone for sale or to give it to someone else.
- Bypass a forgotten PIN, pattern, or password (though be aware of FRP lock, explained below).
This guide will show you how to accomplish a hard reset using the hardware keys to access Android Recovery Mode. As a result of this operation, your Samsung Galaxy A12 will be wiped clean, which can often help improve performance by removing accumulated clutter. The device is powered by a MediaTek Helio P35 (MT6765) chipset and was originally released with Android 10, upgradeable to later versions.
⚠️ WARNING: Performing a hard reset will permanently erase ALL data on your Samsung Galaxy A12, including photos, videos, contacts, apps, and personal settings. Back up any important data before proceeding if possible.
⚠️ FRP LOCK ADVISORY: If a Google Account was previously synced on this device, Factory Reset Protection (FRP) will be activated after the reset. You will need to enter the credentials (email and password) of that Google Account to set up and use the phone again. Ensure you know these details or have removed the Google Account from the device settings before resetting if you intend to give the phone to someone else.
Prerequisites:
- Ensure your Samsung Galaxy A12 has at least 50% battery charge to prevent it from shutting down during the reset process.
- If accessible, try to back up your important data first.
Method 1: Factory Reset from Settings (If Device is Accessible)
If your phone is functioning and you can access the settings menu, this is the preferred method:
- Go to Settings on your Galaxy A12.
- Tap on General management.
- Select Reset.
- Tap on Factory data reset.
- Review the information and then tap Reset.
- Confirm by tapping Delete all.
Your phone will then erase all data and reboot.
Method 2: Hard Reset via Recovery Mode (Using Hardware Keys)
Use this method if your phone is unresponsive, you cannot access the settings menu, or you've forgotten your screen lock.
- Power Off the Device:
- If your phone is on and responsive but locked, first try to power it off. Press and hold the Volume Down button + Power button simultaneously until the screen turns off.

- If the device is already off, proceed to the next step.
- Enter Recovery Mode:
- With the device powered off, press and hold the Volume Up button + Power button together.

- Keep holding both buttons. When the Samsung logo appears on the screen, you can release only the Power button but continue holding the Volume Up button.
- Continue holding Volume Up until you see the Android Recovery screen. You can then release all buttons.
- Note: If you see the "No command" screen with an Android robot, briefly press the Power button, or Power + Volume Up quickly, to enter the main recovery menu.
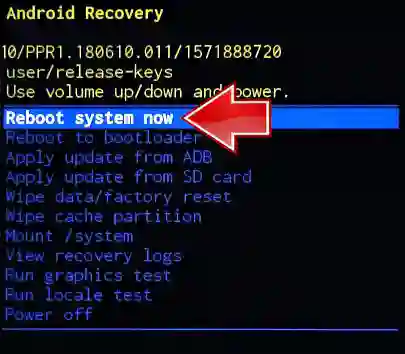
- Navigate in Recovery Mode:
- Use the Volume Down button to scroll down and highlight options.
- Use the Volume Up button to scroll up.
- Use the Power button to select or confirm an option.
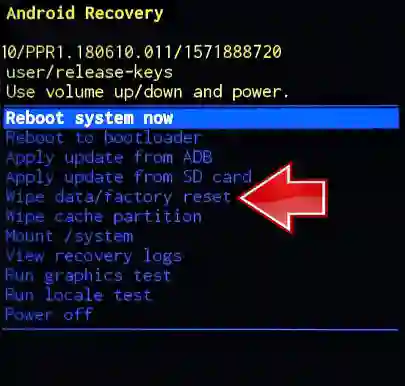
- Wipe Data/Factory Reset:
- Scroll down to highlight "Wipe data/factory reset" and press the Power button to select it.
- Confirm Factory Data Reset:
- Scroll down to highlight "Factory data reset" (or "Yes -- delete all user data" on some versions) and press the Power button to confirm.
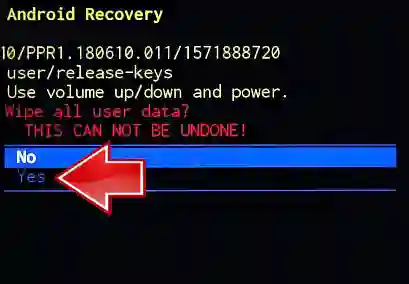
- The device will now begin the wiping process. This may take a few moments.
- Reboot System:
- Once the data wipe is complete, you will be returned to the main Android Recovery screen. The option "Reboot system now" should be highlighted by default.
- Press the Power button to select it.

Success! Your Samsung Galaxy A12 will now reboot. The first boot after a hard reset can take longer than usual as the system sets itself up from scratch. You will then be greeted with the initial Android setup wizard, where you'll need to configure your device as new (and enter Google account details if FRP was active).
